
First Type – Chamberlain & Liftmaster Security 2.0+ Technology
(Up and Down Arrow Buttons)

The program buttons are located on the back of the opener, you may need to open the lens cover for
the light to locate these controls.
1. Start with the garage door in the down/closed position.
2. Press and hold the adjustment button until the Up Arrow button begins to blink. The adjustment
button is the rectangular button between the Up and Down arrow buttons.
3. Press and hold the Up Arrow button until the door reaches your desired open position. You can
use both the Up and Down arrow buttons for adjustment.
4. When the garage door is in your desired Up/Open position, press and release the rectangular
adjustment button. The garage door opener light will blink twice and the Down arrow light will
begin to blink.
5. Press and hold the Down arrow button until the garage door reaches your desired Down/Closed
position. You can use both the Up and Down Arrow buttons for adjustment.
6. When the garage door is in your desired Down/Closed position, press and release the
rectangular adjustment button. The garage door opener light will blink twice and the Up Arrow
button will begin to blink.
7. Press and release the Up Arrow button. The door will open to the programmed Up/open
position. And then the Down Arrow button will begin to blink.
8. Press and release the Down Arrow button. The garage door will close to the programmed
down/closed position.
9. This completes the Travel and Force Limit adjustments.
Compatible Models –
Brand |
Models |
Chamberlain |
B353, B373, B500, B503, B510, B550, B550C B730, B740, B750, B970, B1381, B2202, B2211T, B2212T, B2401, B2405, B4505T, B4545, B4603T, B4613T, B4643T, B6713T, B6753T, B6755, 6765, C203, C205, C253, C273, C450, C2102, C2202, C400, C410, C450, C455, C870, C2212T, C2405, 349544, 349544EV, D2101, HD220, HD220C, HD420EV, HD520EV, HD750WF, HD920EV, HD930EV, HD950WF, LW260C, LW2200 LW3000EV, LW5000EV, LW9000WF, PD220, PD222, PD612EV, PD752KEV, PD762EV, RJ020, RJ070, WD832KEV, WD850KEV, WD930EV, WD962KEV, WD962KPEV, WD962MLEV, |
LiftMaster |
8010, 8065, 8075, 8155, 8155W, 81550, 8160W, 8160WB, 8164W, 8165, 81600, 81602, 81650, 8165W, 83650-267, 8365-267, 8365-267W, 8355, 8355W, 8360, 8360W, 84501, 84504R, 84505R, 84602, 85503-267, 8557, 8557W, 8587, 85870, 8587W, 8500, 8500W, 8550, 8550W, 8550W-267, 85503, 84501, 84602, 87802, 87504-267, 98022, |
**The Force Limits are set during this programming process and there are no additional steps needed.
Second Type – Purple and Black or Black and Yellow Buttons
(Manufactured 2005-2011)

Programming travel and force limits must be performed when garage door opener is first installed.
Travel limits control how far the garage door will open and close during operation, force limits regulate
the amount of force used during opening and closing of the garage door. The black button controls the
op/open movement and the purple or yellow button controls the down/close movement.
Setting the Up/Open Limit
1. Start with the garage door in the Down/closed position.
2. Press and hold the black button until the yellow LED begins to blink, then release the black
button.
3. Press and hold the black button until the door reaches your desired Up/Open position. Make
sure the garage door opens far enough for your vehicle but not past the point where the bottom
of the garage door is even with the header of the garage door opening.
4. You can adjust the open position using both the black button for open/up movement and purple
or yellow button for down/close movement.
5. Press the wall button or the button programmed on the remote to set the Up/Open limit. The
garage door will begin to close.
6. When the door begins to close immediately press and release the black or purple/yellow button
to stop the door.
Setting the Down/Closed Limit
1. The door should be in the Up/Open position.
2. Press and hold the purple or yellow button until the garage door reaches your desired
Down/Closed position.
3. When the garage door reaches the Down/Closed position, you can make adjustments using the
black button for open movement and the purple/yellow button for down movement. Make sure
the garage door is fully closed with the weather seal on the bottom of the door resting on the
floor, but not so far closed that the opener rail is flexing upward toward the garage ceiling.
4. Press the wall button or the button programmed on the remote to set the Down/Closed limit.
The garage door should begin open to the programmed Open/Up position.
Setting the Force Limits
1. Press the purple/yellow button 2 times to enter the Force Adjustment Mode.
2. Press the wall button or the button programmed on the handheld remote. The garage door will
close to the Down/Closed position.
3. Push the wall button or the button programmed on the remote a second time and the garage
door will open to the Up/Open position.
4. Push the wall button or the button programmed on the remote a third time and the garage door
will close to the Down/Closed position.
5. The yellow LED will stop blinking when the learn force has been set.
The force limit is self-adjusted during this process, there are no other force adjustments required for this
unit. The garage door opener must run through a complete open and close cycle for the force limit to be
properly set.
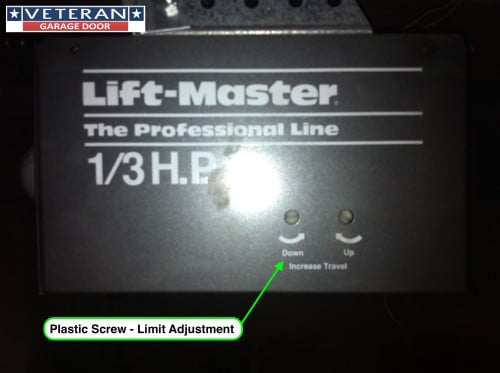
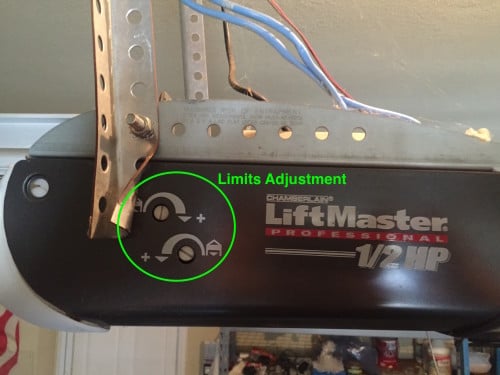
Third Type – Older Style with Plastic Screw Adjustments
Travel Limits control how far open and how far closed your garage door opener opens and closes the
garage door. Proper travel limits will prolong the life of your garage door opener and prevent damage to
the garage door. The proper open position for your garage door, when fully open, is when the bottom of
the garage door is even with but not past the garage door opening header. The garage door opener
trolley should stop in the fully open position at minimum 1 inch from the stop bolt on the opener rail.
The proper fully closed position is when the seal on the bottom of the garage door is resting on the
floor. The opener should not close to the point where the opener rail flexes up, as this can cause
damage to the garage door opener and the garage door. The force limits adjust the amount of force
needed to open and close the garage door.
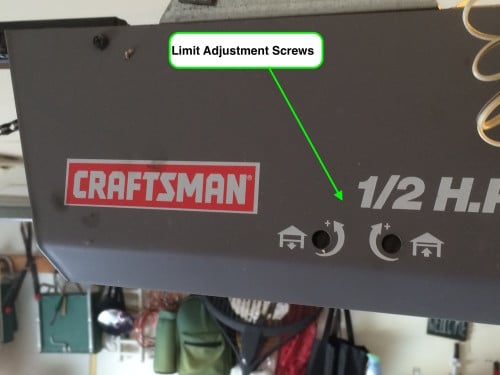
Travel Limit Adjustments
1. Locate the white travel limit adjustment screws, usually located on the side of the garage door
opener motor. There will be two adjustment screws, one will be for the open travel limit and
one for the close travel limit.
2. Start with the door closed and the trolley attached to the garage door. Press the wall button or
button on the handheld remote to open the garage door. When the door is fully open it should
be at least 5’ feet off the ground. Remember the bottom of the garage door should not open
past the header on the garage door opening and you should have a minimum of 1” inch
clearance from the stop bolt on the opener rail.
3. Using the up/open limit adjustment screw you will turn the screw clockwise for more open
travel and counter clockwise for less open travel. One full turn of the adjustment screw will
equal about 2” of travel adjustment. It is important to set the up/open travel limit properly. If
the door opens too far it can damage the opener, garage door and it can cause the door to go
off track. (the cables can unwind from the drums if the garage door opens too far)
4. Once the open travel limit has been set to the desired fully open position you will next set the
down travel limit.

5. Using the down/close adjustment screw you will set the down travel limit. Turning the down
limit adjustment screw clockwise will decrease the down travel and counterclockwise will
increase the down travel. Remember, the proper fully closed position is when the seal on the
bottom of the garage door is rest on the floor. The door when fully closed should not reverse
and return to the open position and the operator rail should not flex up. If the door closes too
far and does not reverse and return to the fully open position it can cause damage to the garage
door opener and the garage door. It is very important to set the down close limit properly.
6. Once the open and close travel limits have been set run the door through 2-3 full open and close
cycles to assure the door opens and closes to the desired locations.
Compatible LiftMaster Models –
Chain Drive – 2245, 2255, 3245, 3255, 3245M, 3255M, 2265, 3265, 3265M, 2565, 2575, 3575, 3575S, 3275, 2595,
3595, 3595S,
Force Limit Adjustments
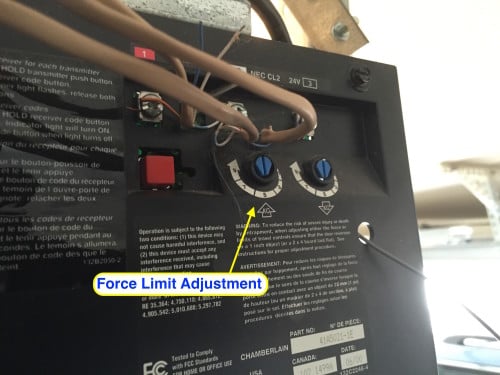
1. Locate the force limit adjustment screws usually on the back of the opener motor, and usually
blue in color.
2. Start with the door open.
3. Press the wall button or button on the handheld remote to close the garage door.
4. When the door is about hallway closed, grasp the bottom of the garage door. The door should
reverse and return to the fully open position. If the door is hard to hold or does not reverse,
then decrease the down/close force by turning the screw counter clockwise. If the garage door
reverse by itself without grasping the bottom of the garage door, then increase the down/close
force by turning the adjustment screw clockwise.
5. Make small adjustments at a time to the force limits, retesting after each adjustment.
6. Once the down/close force adjustment is set, you will set the up/open force limit.
7. With the garage door fully down/closed, press the wall button or the button on the remote to
open the garage door.
8. When the garage door is about halfway up/open, grasp the bottom of the garage door. The door
should stop opening. If the door does not stop or is hard to hold, then decrease the open force
by turning the up/open force adjustment screw counterclockwise. If the garage door does not
fully open, increase the up/open force by turning the up/open adjustment screw clockwise.
9. Make small adjustments at a time to the force limits, retesting after each adjustment.
10. When the up/open and down/close force limit adjustments are set , run 2-3 full open and close
cycles to confirm the settings are proper.